

Marketing Automation Made Simple: A Step-by-Step Guide

Dealer Teamwork Wins 2020 AWA Award for Marketing Automation – Dealer Teamwork
August 30, 2020
Benefits of Marketing Automation
August 30, 2020Marketing Automation Made Simple: A Step-by-Step Guide
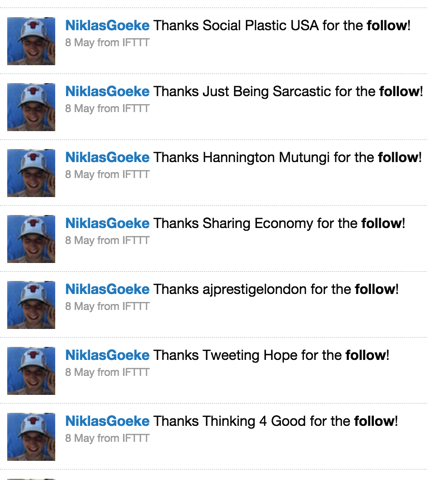
If you’re a vigilant marketer, you might sometimes notice “odd behaviors” on social media or other platforms.
Signs that things are just a little bit off.
For example, you may go to someone’s Twitter timeline, look at their tweets and replies and see something like this:
Or maybe you’re in a big Facebook group, and somehow the creator, even though super busy, always posts the same status update every Wednesday, like here:
What you’re seeing is nothing to worry about. In fact, you can learn from it and use it to your advantage.
This is marketing automation in action.
Since social media has gotten way out of control, with over 200 networks and billions of users worldwide, it’s impossible for marketers to constantly be productive on all of them.
Just maintaining a very active profile on one social network is a full time job on its own.
So, how can you keep up with your Twitter, Facebook, Instagram and other social media networks, all at once?
Marketing automation is the answer.
You’ve probably heard this term before. Don’t feel bad if you don’t know exactly what it means. 90% of marketers don’t.
Today, for you, that is about to change.
In this marketing automation guide, I will show you not only what marketing automation is, but also how you can get started with it and grow your following, traffic and leads on autopilot.
But, to do that, we need to first look at what marketing automation really is.
In our definitive guide to marketing automation, we found 5 different definitions alone. Hubspot has published an entire article on it.
Some of them talk about marketing automation being tactics, some speak about marketing automation software, others just call it a subset of customer relationship management.
Folks, why don’t we just keep it simple? What marketing automation really means can already be guessed from the term itself: you automate your marketing.
Since automation always requires technology, that is a key part of the process.
Therefore, we can, very simply, define marketing automation like this:
Marketing automation is the process of using software and technology to optimize, automate and measure repetitive online marketing tasks.
That’s all there is to it. Once you find yourself doing the same task, over and over again, you can almost be sure that there is a way to automate it.
This will allow you to optimize how the task is done, not spend any time executing the task yourself and then measure the performance of the task continuously.
The goal of marketing automation is to make you a better marketer, by allowing you to spend more time on important tasks.
There are 3 big areas of online marketing that you can automate, to a certain extent.
The first is email marketing. You can use software to automatically have certain emails sent upon triggering events, like opting in to a sign up form. Delivery is one way to automate your emails, distribution is another.
Second, there’s social media. By now, hundreds of third party software tools allow you to automate distributing your content across most social media platforms. But, you can also automate your social media for growth, by automatically engaging with followers and leads.
The third big sector of automation is landing pages. They used to take a long time to design, coding them manually in HTML and CSS. But, by now, you can use templates and just copy the same designs over and over again.
You can even automate the copy of your landing pages, to some extent, with the help of A/B testing.
I will walk you through how you can get started with automation in each segment of the 3 big marketing automation areas.
How to start automating your email marketing
The very first thing that you can do to start automating your email marketing is to segment your subscribers, based on where they came from.
I’ll walk you through how to do it on Mailchimp, because the platform is free and I know most people use it when they get started.
In your account, go to your email list. Then, under settings, choose “List fields and MERGE tags”
Scroll all the way down and click, “add a field”.
Make it a dropdown.
Give your list field the name of the source of the traffic. For example, if you want to tag all of your subscribers who signed up from one of your blog posts on Medium, then name the field “Medium.”
Uncheck the box that says “Visible?” to hide your form field.
Then, under the list field options, remove all choices but one and name that choice “Yes”.
I’ll show you how to do this later, with LeadPages.
But, you can also just do it with Mailchimp directly.
Go to “Sign up forms” in your account.
Select “General forms”.
You’ll be taken to the menu.
On the right side, you can add fields.
However, since you made it a generic, hidden field, it will be in your standard sign up form already.
Scroll down all the way to the bottom and you’ll see your new field.
Now, all that you have to do is to make sure that this new form only has this hidden field in it for the location and no other ones.
Note: You can also just create your list field right there on the right side, instead of going to list fields and creating it there separately. I just showed it to you the proper way, to make it easier to understand.
You can then scroll to the top and copy the URL of that signup page.
You can now link people to that sign up form at the end of your Medium articles, just like the author of this post does:
She gives me a sign up incentive. But, apart from the info, I don’t see any hidden fields. Maybe she really has a hidden form field on there that tracks whether I signed up from Medium. But, who knows? 🙂
If you failed to segment your email list automatically, get started now!
However, there are also ways to segment your existing list, by simply asking your subscribers.
ConvertKit, for example, allows marketers to tag their subscribers, according to what links they click on.
So, when I send out an email with a link to my latest guide about conversion optimization, I could simply tag anyone who clicks it as “Interested in conversion optimization.”
Pat Flynn recently used this tactic to segment his subscribers:
He just sent out a question and let people decide what they want to learn more about.
By clicking on one of the links, subscribers are automatically tagged and will receive more content about their topic.
Every time I publish a new blog post on Quick Sprout or NeilPatel.com, I send it out to my subscribers.
I use a simple message to do so.
In Mailchimp, to make sure that your blog posts are automatically distributed to your email list, just go to campaigns and select new campaign.
Then, click on RSS campaign.
If I now wanted to automatically email out new posts on neilpatel.com as well, I could just enter my blogs URL.
They will then find the RSS feed URL for me, so I don’t have to worry about that part.
Also, set your email to once a week or once every two weeks, depending on how often you publish content.
Then, simply click next and you can design your email as usual, but all posts will be sent out automatically with the message that you define.
You can also deliver bonuses automatically. For example, you can do this with LeadPages.
If you design a landing page where you’re giving away a lead magnet, like this one, you can easily deliver that bonus with LeadPages.
Once people opt into your landing page, there’s an option in the LeadPages editor to send a customized email upon their registration.
In your LeadPages editor, turn on that feature on the left side.
Once you then click on “Customize the email,” you can deliver a personalized message with a link to your bonus.
(I made this up)
Once it’s in place, you don’t have to worry about the tech side of this again, you can simply copy and scale the process, every time you create a new landing page, as the settings will be copied right with it, at least in LeadPages.
You only have to change the link to your bonus and you’re set.
I talked about autoresponders a little bit in the last guide. Basically, once someone opts into your email list, you can send them a sequence of emails over a set period of time.
For example, if you opt in at Comfort Zone Crusher, you are instantly invited to a challenge.
I immediately get the first challenge and am invited to participate in the community.
2 days after my first challenge, I get another email called “5 steps to conquer any scary situation.”
Then, I receive the second challenge, 2 days after that.
Then a video, then an article, always 2 or 3 days apart.
Eventually, Till, the creator, slowly introduces me to a course that he offers, where I can further learn about leaving my comfort zone.
Till doesn’t write those emails for every single person who opts in. That’s what an autoresponder is for.
They are a great way to connect with your audience, take them on a journey and eventually sell something to them after establishing a relationship.
Pro tip: If you want to learn how to create good autoresponders, opt in to a couple of email lists in your industry and watch what happens over the next few days 😉
You can set up autoresponders in Mailchimp (a paid feature), by clicking on automation.
Then, you just set up your series of emails and when they’re triggered and you’re good to go!
Run your social media on autopilot
There are two ways to automate your social media. You can, of course, also automate the distribution here, just like with email.
This is probably the most automated part of marketing yet, as many marketers use third party tools to post their content to social media.
However, if you dig a bit deeper, you can also automate your growth on social media, at least partially.
Let’s start with…
Since the average internet user has 5 social media accounts, I bet that you, as a marketer, have at least that many.
Naturally, you want to notify people about what’s new with you and your business on all of them.
Have you ever sent the same post or status update out on 5 different channels manually?
It’s really annoying, right?
Well, thanks to marketing automation, there are now tools to handle that for you.
Buffer is, by far, the best way to get started, since it’s completely free in its basic version.
You can then Buffer posts, for example, right from your Twitter account.
I then get to set different messages for different channels and can schedule the update for whenever I want.
What’s more, when you click on “Power Scheduler,” right at the top right, you can even plan posting the same update multiple times, across multiple channels, in advance.
Their pro plan is just $10 per month and allows up to 10 accounts and 100 updates at a time.
If you want to take your distribution automation a step further, you can consider a tool like Edgar.
It’s similar to Buffer, however, it creates a library of all of your posts and cycles them endlessly.
Once Edgar has posted every update you put into your library on your various social media channels, it just starts over again. You can just add in new posts as you go along, and thus increase your library, making posts less and less repetitive.
It costs a lot more than Buffer, but if you have a lot of content for your business, it’s a good way to get it in front of lots of people’s eyes, again and again.
On premium, Buffer also lets you automate RSS feeds. An RSS (Rich Site Summary) feed is a way to stay on top of any given website’s content.
If you follow the feed, you will automatically find all of the latest posts in your RSS reader.
For your own business, though, you automatically want to republish each post that they publish. And, you might want to do this for some other big sites in your industry, too.
You can also automate this for free, using a marketing automation service called IFTTT.
IFTTT stands for “If This, Then That” and simply allows you to create rules that follow this framework.
If a certain trigger event happens, IFTTT will automatically react in a way that you can define.
Let’s say you want to post all of Lifehacker’s new posts to your Twitter account.
First, you need to find the RSS feed URL, which can be a bit tricky at times.
Here’s how to do it on any site.
Right click somewhere on the page and select “View Page Source”.
Then, hit Cmd+F and search for “rss.”
Look for the snippet that says “type=”application/rss+xml””.
This is the part that comes right before the feed URL. After it, you’ll see, there’s a title tag that says “Lifehacker – all stories.”
Right after that, you’ll find the feed URL.
In this case it’s http://feeds.gawker.com/lifehacker/full.
Great! Copy that.
You can then follow a very easy structure to set up your recipe.
Click on “that.”
You can search all of the channels again. This time, make it Twitter.
Select “Post a tweet with image.” You could just tweet the article link as well, but visuals help a lot on social media, so you might as well choose the image option.
Customize your message a bit, leave the pre-defined tags in there and hit “Create Action.”
Finally, click “create recipe.”
Boom! Now you’ll automatically tweet about every post on Lifehacker. How cool is that?
You can do the same with your own blog, of course! Just tweak the recipe a little bit, by changing the feed URL and you’re all set.
But, you don’t have to stop at just automating the distribution of your social media.
You can also automate your social media account’s growth.
Twitter is the best network to automate. There are probably tools to do it on other networks too, but Twitter is by far the easiest and there are many free tools to help you do it, so we’ll stay with it.
A surefire way to grow your Twitter account is to follow more people.
But, manually following thousands of accounts and finding who to follow is a huge pain.
Luckily, there’s Tweepi.
Another free tool (at least as a basic version), this allows you to easily see who follows you, who you follow and also who follows you but you don’t follow them back and vice versa.
Simply log in with your Twitter account and you’ll be taken to your dashboard. From there, the first thing that you should do is follow everyone back who follows you.
These people already follow you and by following them you make it more likely that they’ll retweet you. Plus, you’ll get in front of more people’s eyes, so it’s an easy win.
Click on the blue square that says “You’re not following back” and you’ll be taken to that list of people.
You can now follow everyone back, with one click. As soon as you hover over “following you,” you’ll be able to click “follow back.”
It’s still a manual process, but much easier, because you can follow back hundreds of accounts in a few minutes.
Even better, Tweepi automatically jumps to the next user, so all you have to do is keep clicking.
Once you’re done, you can just go to the next page. Rinse and repeat.
Note: Tweepi also has integrated some restrictions and limits, so don’t worry about bulk following or unfollowing people. Tweepi will tell you when to stop.
As soon as you follow everyone who follows you, go back to your dashboard.
But, how can you make sure they are part of your target audience?
Simple: Follow the people who follow major influencers in your industry.
Click on “Follow followers,” from your dashboard.
Now, you can set an account that’s popular in your industry and then see who follows them, so you can follow the same people.
For example, for me, Hiten Shah’s Twitter account would be a great one to put in there, since he’s my partner and our target groups are basically identical.
Then, I get a list that looks just like the one before and I can follow all of these people, a lot of which will naturally follow me back.
Let’s take it another step further.
You can automate this, too.
ManageFlitter offers this as a service. Their pro subscription costs $12/month and has a feature built in where they automatically do this “follow someone’s followers” procedure for you.
They even spread it out over time, so it looks natural.
They also have a bulk engage feature, which lets you directly tweet directly to up to 6 accounts per day, so you can start talking to people 1-on-1.
You’ll then have to jump in and continue manually from there, but it’s a great way of sparking more conversations.
Finally, there’s one more thing you can automate on Twitter.
Direct messaging.
You can only send a direct message to someone on Twitter once they follow you. With Crowdfire, you can automate this.
You simply sign up with your Twitter account, just like with the other services.
Once you’re logged in, go to “Automate,” at the very bottom of the sidebar.
Check the box to automatically send DM messages.
Then, you can add multiple messages to be sent to your new followers, upon first contact. Simply send them a link to one of your most popular blog posts, for example, to get them to your site.
Set 4-5 different messages and Crowdfire will select one at random to send to each new follower.
I get about a 10% engagement rate, which is not too bad!
Pro tip: Make your link a Bitly link, so you can track how many people click on each one, to see which messages work and which don’t.
Once you’ve implemented all of these, you can watch your Twitter account grow on autopilot.
Next up: Landing Pages.
How to minimize the time you spent on designing landing pages
While this isn’t 100% automated, it’s as close as it gets.
That way, you won’t have to worry about design with the help of a coder or fiddling around with your CSS code.
I’ll show you how to do it with LeadPages, since that’s what I use.
Inside LeadPages, there’s a huge marketplace that’s full of templates that you can use.
Let’s say that you want to create a registration page for a webinar (maybe you’re an affiliate marketer?), like mine.
Inside LeadPages, go to the Templates section.
Select “webinar” (they even sort the pages by purpose. How awesome is that?).
Then, sort by conversion rate.
This means the best converting templates will show at the top.
You’ll see the template that I used come up here, too.
Select the template that you want and you’ll be taken to the editor.
You can then click on all of the elements on the page and change them with the click of a button.
When you click on the registration buttons, you can even automatically add sign ups to your email list, for example, in Mailchimp.
Once you’ve done that, you can also segment them, by adding the hidden form fields you created earlier, when they sign up.
Just click on “Show advanced options.”
You can then select the form field for your webinar. Or, if it’s a landing page that you’re sending visitors to, from Medium, as in our earlier example, the respective form field.
Remember how we removed all answers before and only left “Yes” as an option?
Now, if you click on the field, once selected, simply make “Yes” the default option.
Now, everyone who signs up from that page will automatically be tagged by having a “Yes” in that hidden form field.
They won’t see it, but you’ll know where they came from.
Once you save your Leadpage, you can simply publish it on your website, using their WordPress plugin.
Then, you can link to it, just like you could to any other page on your website.
Here comes the part where it gets really easy. Now, whenever you need a new webinar registration page, you only have to go to your Leadpages menu, click on “Edit” and duplicate the page.
You’ll have a new version of the same page ready to go in seconds.
Now, what about the copy?
Whenever you edit a Leadpage, if you have a pro account, you can also just click on “AB Test.”
What this will do is let you create 2 different versions of the same page.
Leadpages will then automatically show both versions to visitors of the site and tell you which one converts better.
This is a great way to test the copy of your landing page.
What call-to-action converts better?
“Sign up now” or “Claim my spot”?
The only way to know is to test it.
With landing page software, like Leadpages, you can do this automatically.
Okay, so we covered a whole lot of marketing automation here, so let’s bring it all together.
Lining up the pieces with automated funnels
You probably already know what a marketing funnel is (remember I talked about it, with respect to conversion optimization?).
If not, it’s a series of events that you let your visitors go through, with the goal of converting them into customers at the end.
Combining email marketing, social media and landing page automation, you can create fully automated funnels.
Let’s say that you want to run a webinar that promotes your course on marketing automation.
Naturally, you schedule a bunch of tweets the week before the event and make one of the automated direct messages that you send to new followers about the webinar.
People will be driven from your Twitter account to your registration page automatically, where they will then sign up for the webinar.
The moment they are signed up, you can immediately tag them with a hidden field as “interested in marketing automation,” as well as “registered” for the webinar.
However, instead of just waiting for them to show up to the webinar, maybe you have an autoresponder series attached to the marketing automation tag.
That way, they’ll be instantly getting the first in a series of emails about your marketing automation course.
They can either show up to the webinar or watch the replay, where you’ll introduce them to the product. Or, they can wait a few days and then learn more from your autoresponder.
Pro tip: You can also use a webinar you previously recorded to create an evergreen funnel.
Even if they choose not to buy, you still have them on your email list, where they’ll be sent all of your new content automatically. So, they’ll stay engaged until you run your next promotion.
I hope this sample idea of a funnel showed you how powerful marketing automation really is.
The truth is, once your traffic passes a certain point, it’s almost impossible for you to talk to every one of your fans personally.
If you use marketing automation in an ethical way, it allows you to still build great relationships (which you can continue in person later on) and to provide value to more people.
This shouldn’t be abused for sending spam emails. Your customers will see through a scam, right away.
Use this marketing automation guide to automate what you don’t have time for and let your customers follow a constant stream of value.
The only question is, what’s the first thing that you’ll automate?
Let me know in the comments.